
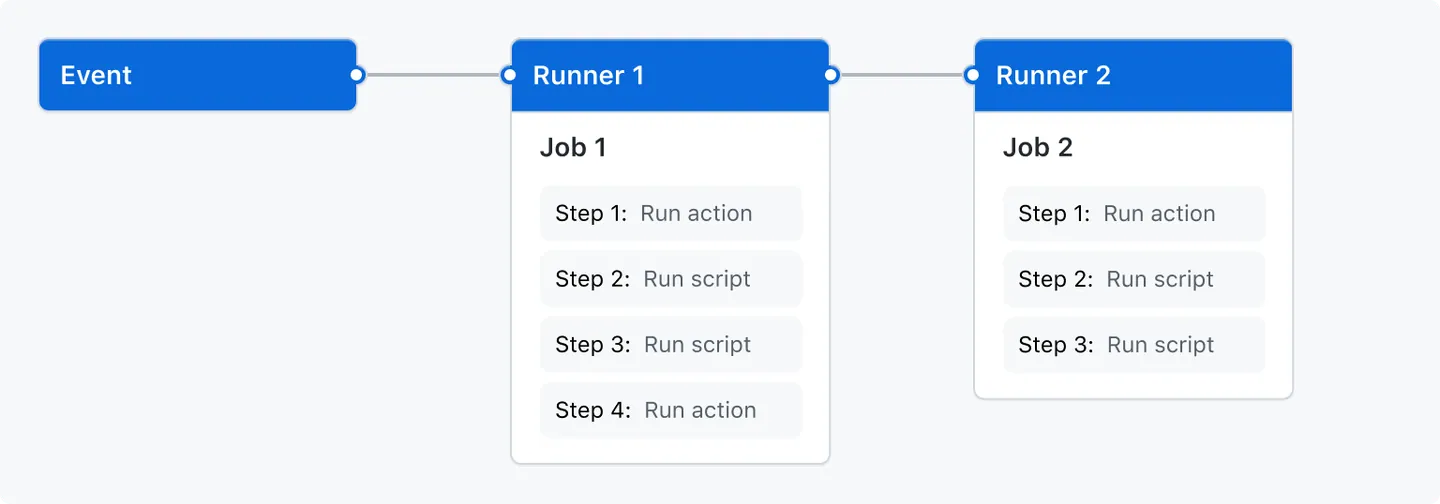
Github Action
GitHub Actions를 사용하여 리포지토리에서 바로 소프트웨어 개발 워크플로를 자동화, 사용자 지정 및 실행합니다. CI/CD를 포함하여 원하는 작업을 수행하기 위한 작업을 검색, 생성 및 공유하고 완전히 사용자 정의된 워크플로에서 작업을 결합할 수 있습니다.
테스트
Python 파일 생성 및 테스트
cat > server.py <<EOF
from http.server import ThreadingHTTPServer, BaseHTTPRequestHandler
from datetime import datetime

class RequestHandler(BaseHTTPRequestHandler):
    def do_GET(self):
        self.send_response(200)
        self.send_header('Content-type', 'text/plain')
        self.end_headers()
        now = datetime.now()
        response_string = now.strftime("The time is %-I:%M:%S %p, CloudNeta Study.\n")
        self.wfile.write(bytes(response_string, "utf-8"))

def startServer():
    try:
        server = ThreadingHTTPServer(('', 80), RequestHandler)
        print("Listening on " + ":".join(map(str, server.server_address)))
        server.serve_forever()
    except KeyboardInterrupt:
        server.shutdown()

if __name__== "__main__":
    startServer()
EOF
----

python3 server.py
Github 셋팅
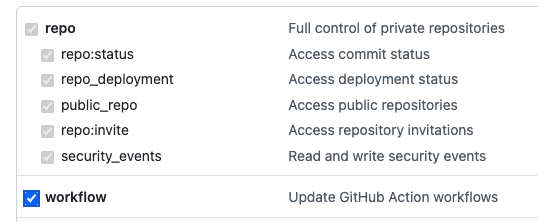
Github에는 더 이상 ID/PW 만으로는 작업이 불가합니다. 이에 접근하기 위한 토큰을 생성합니다.
Settings -> Developer Settings -> Personal access tokens
권한(scopes)는 repo/workflow
local git 설정
git init
git remote add origin https://github.com/ysyukr/cicd-2w.git

git status
git add .
git cimmit -m "Init. Commit"

git config --global user.name ysyukr
git condig --global user.email ysyukr@mail.com
git config --global credential.helper store

git push origin main
코드 실행
nohup sudo python3 server.py > server.log 2>&1 &
코드 수정 및 재실행
# 프로세스 중지
sudo ss -tnlp
sudo fuser -k -n tcp 80
sudo ss -tnlp
# 실행
nohup sudo python3 server.py > server.log 2>&1 &
workflow 구성
# .github/workflows/deploy.yaml
name: CICD1
on:
  workflow_dispatch:
  push:
    branches:
      - main

jobs:
  deploy:
    runs-on: ubuntu-latest
    steps:
      - name: Configure the SSH Private Key Secret
        run: |
          mkdir -p ~/.ssh/
          echo "${{ secrets.SSH_PRIVATE_KEY }}" > ~/.ssh/id_rsa
          chmod 600 ~/.ssh/id_rsa

      - name: Set Strict Host Key Checking
        run: echo "StrictHostKeyChecking=no" > ~/.ssh/config

      - name: Git Pull
        run: |
          export MY_HOST="${{ secrets.EC2_PIP }}"
          ssh ubuntu@$MY_HOST << EOF
            cd /home/ubuntu/cicd-2w || exit 1
            git pull origin main || exit 1
          EOF

      - name: Run service
        run: |
          export MY_HOST="${{ secrets.EC2_PIP }}"
          ssh ubuntu@$MY_HOST sudo fuser -k -n tcp 80 || true
          ssh ubuntu@$MY_HOST "nohup sudo -E python3 /home/ubuntu/cicd-2w/server.py > /home/ubuntu/cicd-2w/server.log 2>&1 &"

# git push
git add . && git commit -m "add workflow" && git push origin main

# server
grep -i cicd server.py
sudo ps -ef |grep server.py
tail /home/ubuntu/cicd-2w/server.log
워크플로우 개선
# workflow
name: CICD2
on:
  workflow_dispatch:
  push:
    branches:
      - main

jobs:
  deploy:
    runs-on: ubuntu-latest
    steps:
      - name: Github Repository Checkout
        uses: actions/checkout@v4

      - name: copy file via ssh
        uses: appleboy/scp-action@v0.1.7
        with:
          host: ${{ secrets.EC2_PIP }}
          username: ubuntu
          key: ${{ secrets.SSH_PRIVATE_KEY }}
          source: server.py
          target: /home/ubuntu

      - name: executing remote ssh commands
        uses: appleboy/ssh-action@v1.2.0
        env:
          AWS_KEYS: ${{ secrets.MYKEYS }}
        with:
          host: ${{ secrets.EC2_PIP }}
          username: ubuntu
          key: ${{ secrets.SSH_PRIVATE_KEY }}
          envs: AWS_KEYS
          script_stop: true
          script: |
             cd /home/ubuntu/cicd-2w
             echo "$AWS_KEYS" > .env
             sudo fuser -k -n tcp 80 || true
             rm server.py
             cp /home/ubuntu/server.py ./
             nohup sudo -E python3 /home/ubuntu/cicd-2w/server.py > /home/ubuntu/cicd-2w/server.log 2>&1 &
             echo "test" >> /home/ubuntu/text.txt

# git push
git add . && git commit -m "using scp ssh action" && git push origin main
Workflow(w/Ansible)
name: Run Ansible
on:
  workflow_dispatch:
  push:
    branches:
      - main

jobs:
  run-playbooks:
    runs-on: ubuntu-latest
    steps:
      - name: Github Repository Checkout
        uses: actions/checkout@v4

      - name: Setup Python 3
        uses: actions/setup-python@v5
        with:
          python-version: "3.8"

      - name: Upgrade Pip & Install Ansible
        run: |
          python -m pip install --upgrade pip
          python -m pip install ansible

      - name: Implement the Private SSH Key
        run: |
          mkdir -p ~/.ssh/
          echo "${{ secrets.SSH_PRIVATE_KEY }}" > ~/.ssh/id_rsa
          chmod 600 ~/.ssh/id_rsa

      - name: Ansible Inventory File for Remote host
        run: |
          mkdir -p ./devops/ansible/
          export INVENTORY_FILE=./devops/ansible/inventory.ini
          echo "[my_host_group]" > $INVENTORY_FILE
          echo "${{ secrets.EC2_PIP }}" >> $INVENTORY_FILE

      - name: Ansible Default Configuration File
        run: |
          mkdir -p ./devops/ansible/
          cat <<EOF > ./devops/ansible/ansible.cfg
          [defaults]
          ansible_python_interpreter = '/usr/bin/python3'
          ansible_ssh_private_key_file = ~/.ssh/id_rsa
          remote_user = ubuntu
          inventory = ./inventory.ini
          host_key_checking = False
          EOF

      - name: Ping Ansible Hosts
        working-directory: ./devops/ansible/
        run: |
          ansible all -m ping
이 작업을 통해 Github Action을 활용하여 EC2(VM)에 파일 전송 및 서비스 재시작까지 가능합니다. 만약 Kubernetes라면 지난번 포스트에서 제가 소개한 것과 같이 yaml 명세에 대해 필요한 정보를 기입하여 배포해볼수도 있을 것입니다.
번외
현재 이 블로그도 Github Action을 통해서 Github에 저장한 Markdown 및 기타 파일들을 가지고 hugo를 통해서 Netlify에 정적 사이트 파일을 배포하고 있습니다. 현재 사용중인 workflow에 대한 공유합니다.
workflow는 4년전에 작성한 것과는 다르게 간결하게 변경되었습니다. 그 사이에 hugo 버전의 변경도 있었지만, 테마에 손대기 싫어서 버전을 고정처럼 사용중에 있고, 특히 netflify의 경우 github action용으로 만들어둔게 생겨서 변경하여 step을 줄였습니다.
name: Publish Static Web App(Hugo) to Netlify

on:
  push:
    branches:
    - master

jobs:
  build-deploy:
    runs-on: ubuntu-20.04

    steps:
    - name: Checkout repo
      uses: actions/checkout@v1

    - name: Checkout Submodule repo
      shell: bash
      run: |
        git clone https://github.com/ysyukr/hugo-theme-pure.git themes/pure

    - name: Read .env
      id: hugo-version
      run: |
        . ./.env
        echo "::set-output name=HUGO_VERSION::${HUGO_VERSION}"

    - name: Setup Hugo
      uses: peaceiris/actions-hugo@v2
      with:
        hugo-version: '${{ steps.hugo-version.outputs.HUGO_VERSION }}'
        extended: true

    - name: Build Site
      shell: bash
      run: |
        hugo --minify

    - name: Deploy
      uses: jsmrcaga/action-netlify-deploy@v1.1.0
      with:
        NETLIFY_SITE_ID: ${{ secrets.NETLIFY_SITE_ID }}
        NETLIFY_AUTH_TOKEN: ${{ secrets.NETLIFY_AUTH_TOKEN }}
        NETLIFY_DEPLOY_TO_PROD: true
        BUILD_DIRECTORY: public